

Learning how to curve a football is one of the most rewarding skills in the entire sport. Whether you call it curving, bending, curling or swerving the ball, the goal is the same: strike the ball so it spins through the air and bends around defenders, walls or the goalkeeper before dropping into the net. It’s the skill behind some of the most famous goals in football history, and with the right technique, footwork and practice routine, any player — from a Sunday league regular to an academy prospect — can learn to do it consistently.
This guide breaks down exactly how to curve a football step by step, covering the science behind the swerve, the correct contact point, foot placement, run-up angle and follow-through, the most common mistakes that stop the ball from bending, and a structured practice routine you can use to build the skill from scratch. By the end, you’ll understand not just how to curve a football, but why the technique works and how to make it repeatable under match pressure.
The Science Behind Curving a Football
Before getting into technique, it helps to understand why a football curves in the first place. When you strike the ball off-centre rather than dead in the middle, you impart spin on it. As the ball spins through the air, it drags a thin layer of air around with it. On one side of the ball, this spinning air moves in the same direction as the airflow passing over the ball; on the other side, it moves against it. This difference in air pressure — the Magnus effect — pushes the ball sideways, creating the curved flight path you see in a bending free kick or a whipped cross.
The more spin you generate, and the more precisely you control where that spin is applied, the more pronounced and predictable the curve becomes. This is exactly why elite free-kick takers can consistently bend the ball around a defensive wall into the same top corner — they aren’t relying on luck, they’re applying a repeatable technique that manipulates spin with remarkable precision.
Understanding this science isn’t just theoretical — it directly informs every technical adjustment covered later in this guide. Where you strike the ball determines the axis of spin, how fast your leg swings through contact determines how much spin you generate, and your follow-through determines how cleanly that spin is transferred and maintained once the ball leaves your foot. Every coaching cue in this article, from contact point to follow-through, exists to maximise one of those three variables.

Step 1: Choose the Right Contact Point on the Ball
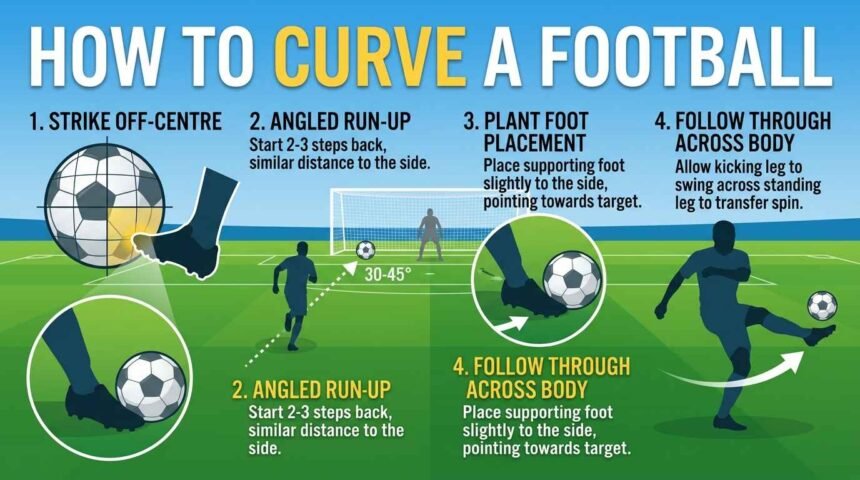
The single most important factor in learning how to curve a football is where your foot meets the ball. Rather than striking through the centre of the ball, as you would for a straight, powerful shot, you need to strike slightly off-centre using the inside of your foot — roughly the area just below the big toe, where the foot naturally curves inward, a technique explained in detail in Adidas’s own coaching breakdown of the contact point.
- To curve the ball from right to left (for a right-footed player), strike the right-hand side of the ball with the inside of your foot.
- To curve the ball from left to right, either strike the left side of the ball with your right foot’s outside edge, or use the inside of your left foot on the left-hand side of the ball.
- Imagine a vertical line running through the centre of the ball — make contact just to the side of that line, not dead in the middle, and keep your contact just below the ball’s horizontal midline to keep the shot low enough to stay under the crossbar.
Locking your ankle at the point of contact is essential. A loose or floppy ankle absorbs the energy of the strike and reduces both spin and power, while a firm, locked ankle transfers maximum spin into the ball.
Step 2: Get Your Run-Up Angle Right
A straight, head-on run-up makes it almost impossible to curve the ball properly, because it doesn’t give your foot the space it needs to wrap around the ball. Instead, footballers looking to bend the ball should approach from an angle — typically starting two to three steps behind the ball and a similar distance to the side, depending on their strongest foot.
This angled approach does two things: it creates the room needed for your kicking leg to swing across the ball rather than straight through it, and it naturally opens your hips, which helps generate the rotational power that feeds into the spin. A good rule of thumb used by many coaches is to imagine approaching the ball as if walking up a diagonal staircase rather than a straight corridor — the angle should feel deliberate, not accidental.
Step 3: Plant Your Supporting Foot Correctly
Your non-kicking foot — the supporting foot — plays a bigger role in curving the ball than most players realise. It should be planted slightly to the side of the ball, a few inches away rather than tucked right up against it, and angled in the direction you want the curve to travel rather than pointing straight at the target.
For a right-footed player curving the ball from right to left, the supporting foot should point slightly to the right of the target. This subtle adjustment opens up your hips and shoulders just enough to let your kicking leg swing across the ball freely during the strike, which is essential for generating clean, controlled spin rather than a scuffed or knuckling shot.
Step 4: Master the Hip and Leg Swing
The curve itself is generated by the sweeping motion of your hip and kicking leg as they swing across your body during the strike — not by brute force. As your kicking leg comes through, the knee should be slightly bent and the leg should accelerate through an arc, brushing across the outside or inside of the ball rather than driving straight through its centre.
Sports science research on elite free-kick technique — including a kinematic study of curve and instep kicks in elite footballers — has shown that curved kicks rely on a greater angular velocity of the knee at the moment of impact compared to a straight, powerful instep strike, while both kick types benefit from the classic coaching principle of “kicking through the ball” at the point of contact. In practice, this means the whipping motion of your lower leg — driven by the hip — is what generates the spin, while your ankle lock and contact point determine its direction and tightness.
Step 5: Follow Through Across Your Body
Follow-through is where many players lose their curve entirely. After striking the ball, your kicking leg should continue swinging across your body in the direction of the curve, rather than stopping dead or following straight through toward the target. A right-footed player curving the ball left should feel their kicking leg finish up and across their standing leg, almost wrapping around it.
A shortened or lazy follow-through reduces both the spin and the accuracy of the shot, so resist the temptation to pull your leg back early. Let the momentum of the swing carry your leg naturally across your body — this is often the single biggest technical fix that turns a flat, straight shot into a properly bending one.
Step 6: Control Your Body Lean and Head Position
Your upper body position matters just as much as your leg technique. Leaning back slightly as you strike the ball helps lift it off the ground and gives it the height needed to curve over a wall or defender, while keeping your head steady and your eyes on the ball through contact keeps the strike clean and consistent.
Avoid leaning too far back, however, as this can cause you to scoop under the ball and lose the side-spin that creates the curve in the first place. The best free-kick takers keep their body lean subtle and controlled, using it to add lift without sacrificing accuracy or spin.
Common Mistakes That Stop the Ball From Curving
Most players who struggle to bend the ball are making one or more of the following technical errors:
- Striking through the centre of the ball instead of off to one side, which produces a straight, knuckling shot instead of a curve.
- A straight, head-on run-up that leaves no room for the kicking leg to swing across the ball properly.
- A loose or unlocked ankle at the point of contact, which bleeds power and spin out of the strike.
- Cutting the follow-through short, stopping the leg immediately after contact instead of letting it swing naturally across the body.
- Supporting foot placed too close or pointed at the wrong angle, which restricts hip rotation and limits how far the kicking leg can wrap around the ball.
- Rushing the run-up rather than committing to a smooth, balanced approach, which throws off both timing and contact point.
Working through this list systematically — ideally filming yourself from behind and from the side — is one of the fastest ways to diagnose exactly why your curve isn’t working and fix it.
Types of Curving Shots in Football
The Classic Bending Free Kick
This is the technique most associated with free-kick specialists: a wide run-up, contact with the inside of the foot, and a pronounced curve that takes the ball around a defensive wall and into the corner of the goal. It prioritises placement and swerve over raw power.
The Outswinging Cross
The same basic curving principles apply when whipping in a cross from wide areas, except the aim is to curve the ball away from the goalkeeper and into the path of an onrushing attacker, rather than directly toward goal.
The Driven, Dipping Free Kick
Some free-kick takers combine curve with topspin to create a shot that bends and dips sharply late in its flight, catching goalkeepers off guard by dropping suddenly under the crossbar.
The Knuckleball (For Contrast)
It’s worth understanding the opposite technique too. A knuckleball free kick is struck through the centre of the ball with minimal spin, using a stiff ankle and short follow-through, causing the ball to move unpredictably through the air rather than curve smoothly — this complete breakdown of free-kick technique compares the two approaches side by side in more depth. Comparing the two techniques side by side makes it easier to understand exactly what contact point and follow-through are doing differently when you curve the ball.
A Practice Routine to Learn How to Curve a Football
Technique alone isn’t enough — curving a football consistently takes repetition. Here is a structured practice routine used by many coaches to build the skill over a few weeks:
- Start close, no wall. Practice from around 12-15 yards out with no obstacles, focusing purely on contact point and follow-through. Aim to curve the ball between two cones rather than worrying about power.
- Add distance gradually. Once you can consistently curve the ball at short range, move back to 18, then 25 yards, adjusting your run-up angle as the distance increases.
- Introduce a wall or mannequins. Practice curving the ball around a simulated wall, focusing on getting enough height and bend early in the flight to clear it before dropping back down toward goal.
- Practice from both sides of the box. Most players naturally favour curving the ball one way — deliberately practising from the opposite side forces you to refine your technique rather than relying on a single favoured angle.
- Track your success rate. Take 20-30 attempts per session and log how many hit the target zone. Many coaches recommend aiming for a 70%+ accuracy rate in practice before expecting similar reliability in a match.
- Film yourself. Recording your run-up, contact point and follow-through from both side-on and behind angles makes it far easier to spot small technical flaws that are hard to feel in the moment.
Consistency matters more than volume. Ten to fifteen minutes of focused, high-quality free-kick practice two to three times a week will build the skill far faster than one long, unfocused session per month. For a broader shooting and finishing routine to pair with this practice plan, check out our football training and skills guides on Sports Tamasha. It’s also worth rotating this routine with general shooting and passing practice, since over-focusing on dead-ball technique alone can lead to fatigue and diminishing returns within a single session — most coaches suggest treating curving practice as a focused add-on to a broader training session rather than an isolated, standalone block.
Equipment Considerations for Curving the Ball
While technique is by far the biggest factor, a couple of equipment choices can make a noticeable difference once your technique is solid. Football boots with a textured or ridged striking surface across the instep and inside of the foot are designed to grip the ball slightly more on contact, which can help generate marginally more spin. Similarly, a ball with a smoother, more consistent panel surface tends to hold spin more predictably in flight than a heavily textured or worn-out ball, which is why professional-level match balls are often preferred for serious free-kick practice. For a closer look at boot choice and other gear that can support your technique, see our football gear and equipment guides on Sports Dastak.
That said, players should be wary of over-relying on equipment as a shortcut — even the best boots and balls will not produce a curve if the fundamentals of contact point, run-up angle and follow-through aren’t in place first.
How Professional Players Curve the Ball So Consistently
Elite free-kick takers make bending the ball look effortless, but it comes down to thousands of repetitions of the exact same fundamentals covered in this guide. Historically, some of the most celebrated dead-ball specialists in football built their reputations specifically around the curling free kick — using a wide, angled run-up and a wrapped, whipping strike to consistently bend the ball around defensive walls into the top corner from 20-30 yards out. Others became known for blending curve with pace and late dip, making their shots far harder for goalkeepers to read.
What separates professional technique from amateur attempts isn’t a secret trick — it’s the precision and repeatability of every stage covered above: contact point, run-up angle, hip rotation, and follow-through, all performed identically strike after strike. That repeatability is exactly what dedicated practice is designed to build. You can see this same step-by-step approach broken down visually in Sikana’s video guide to curling a football, and in our own collection of football skills guides on SportsNewsEra.
Curve, Bend or Curl: Does the Terminology Matter?
One thing that confuses newer players and coaches alike is the terminology. In American English, the skill is almost always described as “curving” the ball, while British and Irish coaches typically say “bending” or “curling” it. Commentators in different parts of the world may use all three terms interchangeably within the same match. The good news is that the underlying technique is identical regardless of which word you use — a coach telling you to “bend it like Beckham” and one telling you to “curve the free kick” are describing exactly the same contact point, run-up and follow-through covered throughout this guide. If you’re searching for coaching resources online, it’s worth searching all three terms, since regional coaching sites and video tutorials often favour one phrase over the others.
Curving the Ball With Different Parts of the Foot
While the inside of the foot is the most common and reliable surface for generating a curve, understanding how other contact points behave can help you diversify your technique as you improve.
Inside of the Foot
This is the primary technique covered throughout this guide, offering the largest, flattest striking surface and the most control over both contact point and spin direction. It’s the best starting point for any player learning how to curve a football for the first time.
Outside of the Foot
Striking with the outside of the foot produces a curve in the opposite direction to an inside-of-the-foot strike from the same foot, and is often used for quick, disguised curling passes or shots in tight spaces where there isn’t time for a full inside-of-the-foot swing. It requires more ankle strength and control, so most coaches recommend mastering the inside-of-the-foot curve first before experimenting with outside-of-the-foot variations.
Laces With a Side Component
Some players blend a laces strike — normally associated with pure power and knuckleball shots — with a slight side component to produce a shot that combines pace with a late, sharp curve. This is a more advanced variation and typically only becomes reliable once the basic inside-of-the-foot technique has been fully mastered.
Adjusting Your Technique for Weather and Pitch Conditions
Curving a football doesn’t happen in a vacuum — wind, rain and pitch surface all affect how much a ball bends in flight, and adjusting for these conditions is part of becoming a reliable dead-ball specialist.
- Windy conditions can dramatically exaggerate or flatten a curve depending on wind direction. A crosswind blowing in the same direction as your curve will increase the bend, sometimes requiring you to aim more centrally than usual, while a wind blowing against your curve can flatten the shot and needs to be compensated for with extra spin or a slightly wider starting angle.
- Wet weather makes the ball skid and grip differently off both your foot and the turf, often reducing the amount of spin you can generate and making the ball travel faster and lower than expected — many coaches recommend slightly more emphasis on the follow-through in wet conditions to compensate.
- Artificial pitches tend to produce a faster, more consistent surface than grass, which can affect your run-up rhythm and timing if you’re used to training exclusively on turf, so it’s worth practising on both surfaces if you regularly play across different pitch types.
Building Confidence to Curve the Ball Under Pressure
Technique is only half the challenge — being able to reproduce a reliable curve in a match, under pressure, with defenders watching and a goalkeeper set on their line, is a different skill from curving the ball comfortably in an empty training session. A few habits help bridge that gap:
- Visualize the strike before you take it. Elite free-kick takers consistently describe picturing the exact flight path of the ball before making contact, which helps commit the body to the technique rather than second-guessing mid-strike.
- Stick to your routine. Whether it’s the number of steps in your run-up or how you place the ball, using the exact same routine every time — in training and in matches — builds the muscle memory needed to perform under pressure.
- Practice with distractions. Simulating match pressure by practising with teammates watching, a mannequin wall in place, or even a countdown clock helps close the gap between training-ground curves and match-day curves.
- Review misses, not just successes. When a curving free kick doesn’t bend as expected, go back through the fundamentals — contact point, run-up angle, follow-through — rather than dismissing it as bad luck.
A Progressive Training Plan for Youth Players
Younger or newer players often benefit from a slower, more structured introduction to curving the ball rather than jumping straight into full-power free kicks. A simple four-stage progression works well:
- Stage 1 — Stationary curl passes. From a standing position with no run-up, focus purely on using the inside of the foot to curve a rolling pass between two cones a few yards away, building a feel for contact point before adding any power.
- Stage 2 — Short run-up, no power. Introduce a short, angled two-step run-up while keeping the strike gentle, focusing entirely on technique and follow-through rather than distance or power.
- Stage 3 — Full technique, moderate power. Combine the full run-up, supporting-foot placement and follow-through at around 60-70% power, gradually building toward match-realistic free-kick distances.
- Stage 4 — Match-realistic free kicks. Practice from typical match distances and angles, incorporating a wall or mannequins and tracking success rate over repeated sessions.
This progression prevents young players from developing bad habits — such as overpowering the strike before their technique is solid — which are often much harder to correct later than they are to avoid from the start. Coaches working with youth teams often find it useful to spend an entire early session purely on Stage 1, resisting the urge to rush players toward full-power free kicks before the underlying contact point and follow-through have become second nature.
Frequently Asked Questions About Curving a Football
Is it easier to curve the ball with the inside or outside of the foot?
Most players find it easier to generate a controlled curve using the inside of the foot, since it offers a larger, more stable striking surface and more precise control over the contact point compared with the outside of the foot, which tends to be used more for quick, disguised curls in tight spaces.
Why does my shot go straight instead of curving?
This is almost always caused by striking too close to the centre of the ball, a straight rather than angled run-up, or a follow-through that stops immediately after contact instead of continuing across the body — work through each of these in order to find the cause.
How long does it take to learn how to curve a football?
Most players can produce a noticeable curve within a few practice sessions once they understand the correct contact point and run-up angle, but consistently bending the ball into a specific target under match pressure typically takes several weeks to months of regular, focused practice.
Can you curve a football with a knuckleball technique?
No — curving and knuckling are opposite techniques. A curve relies on generating consistent spin through an angled strike and full follow-through, while a knuckleball is deliberately struck with minimal spin through the centre of the ball to create unpredictable, erratic movement instead.
Does the type of ball affect how much it curves?
Yes, to a degree. Smoother, more consistently panelled match balls tend to hold spin more predictably in flight, while older, heavily textured or worn balls can behave less predictably, though correct technique remains by far the biggest factor in how much a ball curves.
What muscles are most important for curving a football?
The hip flexors, glutes and core play a major role in generating the rotational power behind a curving strike, while ankle stability is essential for locking the foot at the point of contact — strength and mobility work in these areas can directly improve curving technique over time. Pair strength work with the drills in our football fitness and skills section for a more complete training plan.
Can beginners learn to curve a football, or is it only for advanced players?
Beginners can absolutely learn to curve a football — it simply requires starting with a slower, stationary version of the technique before adding a run-up and power, as outlined in the progressive training plan above, rather than attempting a full-pace free kick from the very first session.
Why do free-kick takers place the ball a certain way before curving it?
Many free-kick specialists place the ball with the valve or a specific panel facing a certain direction out of habit or superstition rather than any proven aerodynamic effect, though consistently placing the ball the same way every time does help build a repeatable pre-kick routine, which supports overall consistency.
Final Thoughts: Building a Reliable Curve
Learning how to curve a football is a genuinely learnable skill, not a natural gift reserved for a handful of elite dead-ball specialists. By focusing on the fundamentals covered in this guide — the correct contact point on the ball, an angled run-up, proper supporting-foot placement, a full hip-driven swing, and a complete follow-through across your body — any player can develop a reliable, repeatable bend on their shots and free kicks. Combine that technique with a structured, consistent practice routine, and what feels impossible today can become second nature within a few weeks of focused training. Keep practising, track your progress, and don’t be afraid to film and review your technique — it’s one of the fastest ways to turn a straight shot into a genuine curler. Whether you’re aiming to become your team’s go-to free-kick taker or simply want to add a new dimension to your shooting and passing, mastering how to curve a football is one of the most transferable and satisfying skills you can add to your game.
Related Reading
- More Football Skills Guides on SportsNewsEra
- Football Training Tips on Sports Tamasha
- Football Technique Guides on Sports Dastak