


How to Throw a Baseball Faster: The Complete Velocity Guide
Every player wants to know how to throw a baseball faster. Pitchers want more speed on the mound. Outfielders want a stronger arm. Infielders want quicker throws to first. The good news is simple. Throwing velocity is a skill, and you can train it.
Speed does not come from your arm alone. It comes from your whole body working in the right order. When your legs, hips, trunk and arm fire in sequence, the ball leaves your hand faster. When they do not, you lose speed and you put stress on your elbow and shoulder.
This guide explains how to throw harder in plain steps. You will learn the mechanics behind a fast throw, the strength work that supports it, the drills that build it, and the arm-care habits that keep you healthy. Read it once, then use it as a checklist for every practice.
Quick Answer: How to Throw a Baseball Faster
Here is the short version. If you only remember a few things, remember these:
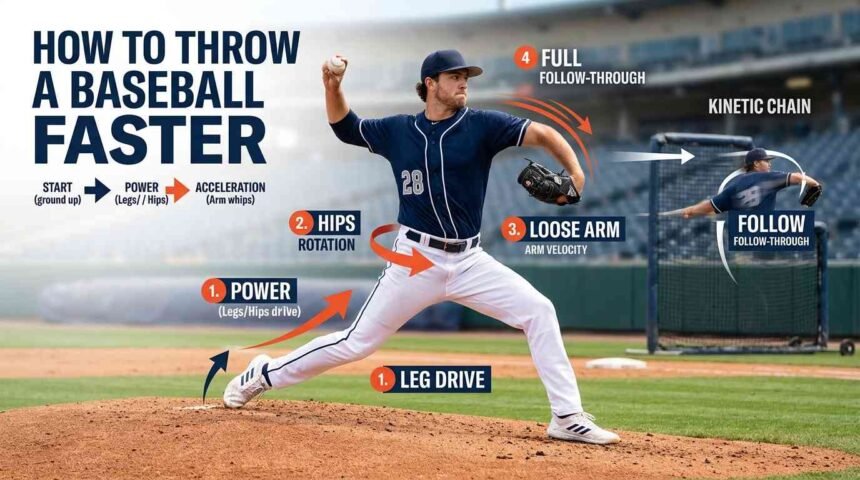
- Use your legs first. Drive off the back leg and land in a strong, stable front-leg position.
- Rotate your hips before your shoulders. This creates the stretch that stores power.
- Keep your arm relaxed. A loose arm moves faster than a tight one.
- Finish through the target. A full follow-through slows the arm down safely.
- Get stronger. Legs, core, back and shoulders all add speed.
- Protect your arm. Rest, warm up and never throw through pain.
Now let’s look at each piece in detail.
How Throwing Velocity Really Works
Many players think a fast throw is all arm strength. That is a common myth. In reality, a hard throw starts at the ground. Energy moves from your legs, through your hips and trunk, up to your shoulder, down your arm and out through your fingers.
Scientists call this sequence the kinetic chain. Each link passes energy to the next one. If one link is weak or mistimed, the chain leaks power. As a result, the ball comes out slower and your arm works harder than it should.
Biomechanics experts describe the goal of throwing as getting the ball out of the hand as fast as possible. According to this baseball velocity training breakdown from Vitruve, the wrist is the last link in a chain that begins in the legs. That single idea explains why leg drive and hip rotation matter so much.
Three Things That Control Your Speed
Three factors decide how hard you can throw:
- Mechanics. How efficiently you move energy through the chain.
- Strength and power. How much force your muscles can produce quickly.
- Mobility. How freely your hips, spine and shoulders can move.
You can improve all three. However, you should work on them together rather than one at a time.
The Six Phases of a Baseball Throw
Every throw follows the same basic phases. Learning them helps you spot exactly where you lose speed.
- Wind-up: You set your body in a balanced starting position.
- Stride: You move toward the target and separate your hands.
- Arm cocking: Your throwing arm reaches its farthest-back position.
- Arm acceleration: Your body and arm fire forward at high speed.
- Arm deceleration: Your body slows the arm after release.
- Follow-through: You finish balanced and ready to field.
Most velocity problems show up in the stride and arm-cocking phases. Because of that, the next steps focus heavily on those moments.
Step 1: Use the Right Grip
Your grip controls how the ball leaves your hand. For the fastest, straightest throw, use a four-seam grip. Place your index and middle fingers across the seams where they form a horseshoe shape. Rest your thumb underneath the ball on the smooth leather.
This grip lets the ball spin backward. Backspin helps the ball carry through the air and stay on line. It also feels more natural for most players.
Grip Pressure Matters
Hold the ball with your fingertips, not deep in your palm. A small gap between the ball and your palm lets the ball roll off your fingers cleanly. Squeezing too hard makes your forearm tense. Tension slows your arm.
Think of holding a small bird. Hold it firmly enough that it cannot fly away. Do not hold it so tightly that you hurt it.
Step 2: Build Power With Your Legs
Your legs are your engine. Good leg drive can add real speed without adding any extra effort in your arm. Many players ignore their lower body and try to muscle the ball with their shoulder. That approach costs velocity and risks injury.
Push Off the Back Leg
Start with your weight balanced. Lift your lead knee and shift your weight over your back leg. Then push hard toward your target. Imagine driving your hips forward, not just stepping forward.
A strong push creates forward momentum. That momentum becomes speed in the ball later in the throw.
Land in a Strong Front-Leg Position
Your front foot should land pointing at or slightly closed to the target. Keep your front knee firm as you land. A firm front leg acts like a wall. Your body rotates around it, and the energy shoots up the chain into your arm.
If your front leg collapses, the energy drains away. You will feel like you are throwing with only your arm.
Step 3: Create Hip and Shoulder Separation
Hip-shoulder separation is one of the biggest secrets of hard throwers. It means your hips start turning toward the target while your shoulders stay closed for a moment longer.
This delay stretches the muscles across your torso. Those muscles then snap back like a rubber band. As a result, your trunk rotates faster, and your arm whips through with more force.
How to Feel It
Try this simple test. Stand sideways to a wall. Turn only your hips toward the wall while your chest stays facing sideways. You should feel a stretch through your core. That stretch is the position you want at foot strike.
Players with tight hips or stiff upper backs often struggle here. Therefore, mobility work is not optional. It is part of velocity training.
Step 4: Get Your Arm Into a Strong Cocked Position
After your front foot lands, your throwing arm should be ready. Your elbow should sit at about shoulder height. Your hand should be up and behind the ball, with the palm facing away from the target.
Your arm should arrive at this spot on time. If it arrives too early, you lose energy. If it arrives too late, you rush the throw and put extra stress on your elbow.
Stay Loose and Athletic
A relaxed arm works like a whip. A stiff arm works like a stick. Keep your shoulders, neck and jaw loose. Breathe out as you throw. These small habits reduce tension and improve speed.
For a deeper look at the arm-cocking position, check the step-by-step throwing guide from TopVelocity.
Step 5: Accelerate and Release
Acceleration happens fast. Your trunk rotates forward, your shoulder turns, and your forearm whips through. Your hand finishes on top of the ball at release.
Release the ball out in front of your body. Snap your fingers through the ball and let your wrist finish naturally. Do not force a wrist snap. Instead, let the speed of your arm do the work.
Release Point Tips
- Release the ball slightly out front for better carry and accuracy.
- Keep your fingers behind the ball at release.
- Aim your chest and front shoulder at the target.
- Keep your head steady and your eyes locked on your target.
Step 6: Finish With a Full Follow-Through
Your arm moves incredibly fast during a throw. Your body must slow it down safely. A full follow-through lets your arm decelerate over a long path instead of stopping suddenly.
After release, let your arm swing across your body toward the opposite knee. Your back leg should come around and land in a balanced fielding position. This finish protects your shoulder and elbow.
Stopping your arm early is a common mistake. It feels harder, but it does not add speed. Instead, it adds stress to the joints.
Strength Training to Throw a Baseball Faster
Good mechanics set the ceiling. Strength and power raise it. Research on throwing has linked strong legs and fast upper-body movement with higher throwing performance, as summarized in the Vitruve velocity training article.
Aim to train your whole body two to three times each week. Build a base first. Then add speed and power work.
Lower-Body Strength
- Squats: Build overall leg strength.
- Lunges: Improve single-leg strength and balance.
- Deadlifts or hip hinges: Strengthen glutes and hamstrings.
- Jump squats and box jumps: Train explosive leg power.
Core and Rotational Power
Your core connects your legs to your arm. A weak core leaks energy. A strong, fast core adds it back.
- Medicine ball rotational throws: Train the exact motion of a throw.
- Planks and side planks: Build core stability.
- Cable or band chops: Strengthen rotation under control.
Coaches often start young athletes with light medicine balls, such as the two-pound throws described by TopVelocity, before moving to heavier loads.
Upper Back and Shoulder Strength
Strong shoulders and upper back muscles help you throw hard and stay healthy. Focus on the muscles that control your shoulder blade and rotator cuff.
- Rows: Build the back muscles that slow your arm down.
- Band external rotations: Strengthen the rotator cuff.
- Face pulls and reverse flys: Support shoulder posture.
- Shoulder presses: Add upper-body strength in a controlled range.
Keep the weights challenging but safe. Good form always comes before heavy loads.
Mobility: The Overlooked Speed Booster
Tight muscles limit your motion. If your hips or upper back cannot rotate, your arm has to make up the difference. That extra work slows the throw and stresses the arm.
Spend five to ten minutes on mobility before every throwing session. Focus on these areas:
- Hips: Hip openers, deep squat holds and 90/90 stretches.
- Thoracic spine (upper back): Open-book rotations and foam rolling.
- Shoulders: Gentle band work and controlled arm circles.
- Ankles: Calf stretches and ankle circles for better balance.
Best Drills to Throw a Baseball Faster
Drills teach your body to move in the right sequence. Keep them simple. Do them slowly first, then add speed.
Balance and Leg-Lift Drill
Lift your lead knee and hold your balance for two seconds. Then drive toward the target. This drill teaches control and a strong push.
Towel Drill
Hold a small towel by one end. Go through your throwing motion at half speed. Try to snap the towel at a spot in front of you. This drill trains a smooth arm path and a loose, fast finish.
Step-Behind Throws
Take a step behind your back leg before you throw. The extra momentum helps you feel your legs driving the throw. Use light effort at first.
Long Toss
Long toss gradually stretches your arm out over greater distances. Start close. Move back a few steps at a time. Use an arc on your longest throws. Then work your way back in with crisp, on-line throws.
Long toss builds arm strength and confidence. However, keep it controlled. More distance is not always better.
Medicine Ball Throws
Rotational and overhead medicine ball throws train explosive power. Use a light ball. Move fast, but stay in control.
Weighted and Underload Balls
Some players use balls slightly heavier or lighter than a standard baseball. These tools can help train speed and arm path. Use them only with a coach’s guidance and in small amounts. Overdoing them can strain the arm.
Common Mistakes That Steal Velocity
Many players lose speed for the same handful of reasons. Check yourself against this list.
- Throwing only with the arm. The legs and trunk should lead the way.
- Opening the shoulders too early. This ruins hip-shoulder separation.
- A soft front leg. Energy leaks out when the front knee collapses.
- Tight grip and tense arm. Tension slows your arm.
- Rushing the arm. Your arm arrives late and forces the throw.
- Cutting off the follow-through. This adds stress and removes speed.
- Skipping the warm-up. Cold muscles move slowly and get hurt easily.
- Ignoring rest. Fatigue lowers speed and raises injury risk.
Filming your throw from the side and from behind is the fastest way to find these issues. Slow-motion video on a phone works well.
A Sample Weekly Plan for Throwing Harder
You need structure to see results. Here is a simple plan that many players can adapt. Adjust it for your age, level and coach’s advice.
Day 1: Lower Body and Throwing
- Mobility warm-up
- Squats, lunges and jumps
- Light throwing and mechanics drills
Day 2: Rest or Light Movement
- Walking, stretching or easy mobility work
Day 3: Upper Body, Core and Throwing
- Mobility and band work
- Rows, presses and core exercises
- Medicine ball throws
- Long toss or focused throwing
Day 4: Rest
- Sleep, food and recovery come first
Day 5: Full-Body Power and Throwing
- Explosive jumps and rotational throws
- Drill work and controlled throws
Days 6 and 7: Recovery
- Rest, mobility and light activity
Rest days are part of the plan. Your body gets stronger during recovery, not during the workout itself.
Arm Care and Injury Prevention
Throwing hard puts stress on the elbow and shoulder. Because of that, smart arm care matters as much as speed training. A player who stays healthy for years will always beat a player who burns out early.
Warm Up Every Time
Never throw at full speed with a cold arm. Start with five to ten minutes of light cardio. Add dynamic stretches and band work. Then begin throwing at short distances and build up slowly.
Respect Pain
Muscle soreness is normal. Sharp pain in the elbow or shoulder is not. If you feel it, stop throwing and tell a coach or parent. Get it checked by a medical professional if it does not go away. Playing through pain can turn a small problem into a serious one, such as a torn ligament that needs Tommy John surgery.
Follow Pitch Smart Guidelines
Young pitchers face extra risk. Overuse and fatigue are major causes of arm injuries. Major League Baseball and USA Baseball created Pitch Smart to help. It gives age-based pitch-count limits and required rest days. You can read more in the joint MLB and USA Baseball announcement about Pitch Smart updates.
A sports medicine doctor also explains why fatigue is such a big risk in this overview of Pitch Smart recommendations.
Coaches and parents should track pitch counts, enforce rest days and avoid having a young player pitch for multiple teams at the same time.
Do Not Chase the Radar Gun Too Early
Young players should not obsess over speed. Learning to throw strikes, change speeds and use good mechanics matters more. Speed will follow naturally as the body grows and gets stronger.
For more training and safety resources, browse our baseball training guides on Sports Tamasha.
Recovery, Sleep and Nutrition
Training only works if your body can recover. Three habits make the biggest difference.
Sleep
Aim for eight to ten hours a night if you are a teenager, and at least seven to nine if you are an adult. Sleep is when muscles repair and the nervous system resets. Poor sleep leads to slower reactions and a higher risk of injury.
Food
Eat enough protein to support muscle growth. Include lean meats, eggs, dairy, beans or other protein sources in each meal. Add plenty of fruits, vegetables and whole grains for energy. Do not skip meals on training days.
Hydration
Drink water throughout the day, not only during practice. Even mild dehydration can hurt strength and focus. You can find more fitness and nutrition tips in our baseball training section on SportsNewsEra.
Throwing Faster at Different Ages and Levels
Youth Players (Under 12)
Focus on fun, coordination and clean mechanics. Play multiple sports. Use body-weight exercises rather than heavy lifting. Keep throwing volume low and follow pitch-count rules.
Teen Players (13 to 18)
Growth spurts change how your body moves. Expect some temporary awkwardness. Add structured strength training with a qualified coach. Keep building mechanics and mobility. This is also the age when velocity often jumps.
College and Adult Players
Adults can still gain speed. Training age matters more than birth age. Focus on mobility, smart strength training and recovery. Add throwing volume gradually so your arm can adapt.
Outfielders and Infielders
Position players throw differently than pitchers. They need quick transfers and accurate throws on the run. Even so, the same principles apply: leg drive, rotation and a loose arm. For practical position-based drills, see our baseball skills and training articles on Sports Dastak.
How to Measure Your Progress
You cannot improve what you do not track. A few simple tools help you see real progress.
- Radar gun or pitching app: Measures speed. Test only once every few weeks to avoid over-testing.
- Video: Shows changes in mechanics from side and rear views.
- Training log: Records your workouts, throws and how your arm feels.
- Strength benchmarks: Track squats, jumps and medicine ball distance.
Expect gradual gains. Adding a few miles per hour over a season is a strong result. Sudden jumps are rare, and chasing them can lead to injury.
A Simple Pre-Throw Warm-Up Routine
A good warm-up prepares your muscles and your nervous system. It also lowers your injury risk. Follow this routine before every throwing session. It takes about fifteen minutes.
- Light cardio (3 to 5 minutes). Jog, skip or use a bike until you feel warm.
- Dynamic leg work (3 minutes). Do leg swings, walking lunges and high knees.
- Hip and trunk rotation (2 minutes). Try open-book rotations and gentle torso twists.
- Band shoulder work (3 minutes). Do external rotations, rows and pull-aparts with a light band.
- Short-distance throws (5 minutes). Start close and throw easy. Then move back slowly.
Do not rush this routine. A slow, steady warm-up lets you throw harder later with less risk.
Off-Season vs In-Season Training
Your training should change during the year. Each phase has a different goal.
Off-Season: Build
The off-season is the best time to gain strength, fix mechanics and improve mobility. Lift three times a week. Add medicine ball work and gradual throwing. Take a true break from throwing at the start so your arm can recover.
Pre-Season: Sharpen
Now you turn strength into speed. Increase throwing volume slowly. Keep drills sharp and add more explosive work. Track your speed and video every few weeks.
In-Season: Maintain
During the season, your goal is to stay strong and healthy. Lift once or twice a week at a lower volume. Focus on recovery, sleep and arm care. Do not try to make big mechanical changes in the middle of the year.
Myths About Throwing Harder
Bad advice spreads quickly in baseball. Here are a few myths worth ignoring.
- Myth: Only big players throw hard. Size helps, but efficient movement and good timing matter more. Many smaller athletes throw very well.
- Myth: You must throw every day. More throwing does not always mean more speed. Rest is where your arm adapts.
- Myth: Lifting makes you tight and slow. Smart strength training with mobility work improves speed. It does not hurt it.
- Myth: Velocity is all that matters. Command, movement and pitch selection often decide games. Speed is only one tool.
- Myth: Pain is part of getting better. Soreness is normal. Sharp or lasting joint pain is a warning sign.
Your Mechanics Checklist
Use this quick checklist during practice. Ask a teammate or coach to film you and check each item.
- Is my grip loose and on the fingertips?
- Do I push off my back leg with intent?
- Does my front foot land firmly and on line?
- Do my hips open before my shoulders?
- Is my elbow near shoulder height at foot strike?
- Is my arm relaxed as it accelerates?
- Do I release the ball out in front?
- Do I finish across my body and stay balanced?
If you answer no to any item, work on that piece first. Small fixes often bring the biggest gains. For more baseball fitness and skills advice, explore our latest baseball guides on SportsNewsEra and our training tips on Sports Tamasha.
Mental Habits of Hard Throwers
The mind plays a real role in speed. Confident players throw freely. Nervous players tighten up and lose velocity.
- Use a routine. A consistent pre-throw routine calms your nerves.
- Pick a target. Focus on the glove, not the speed number.
- Stay athletic. Think fast and loose, not tight and forced.
- Reset after mistakes. Take a breath and move on to the next throw.
Frequently Asked Questions About Throwing a Baseball Faster
How can I throw a baseball harder at home?
You can build speed at home with mobility work, body-weight leg exercises, medicine ball throws and light throwing drills. Film your motion, keep your warm-up consistent and follow a weekly plan with rest days.
How long does it take to increase throwing velocity?
Most players see small gains within six to twelve weeks of consistent training. Bigger changes usually take a full offseason or longer. Progress depends on age, strength, mechanics and recovery.
Does lifting weights help me throw faster?
Yes. Strong legs, a stable core and healthy shoulders all support higher velocity. Lift with good form, progress slowly and combine strength work with mechanics training.
Is long toss good for velocity?
Long toss can help build arm strength and confidence when done in a gradual, controlled way. It works best as part of a complete program that also includes strength, mobility and rest.
What is the most important part of a fast throw?
The most important part is the sequence. Your legs should start the throw, your hips and trunk should rotate next, and your arm should follow. Good timing beats raw arm strength.
Can I throw faster without a strong arm?
Yes. Many players add speed by improving mechanics, mobility and leg drive. A strong arm helps, but efficient movement often matters more.
How do I avoid arm injuries while training for speed?
Warm up properly, build volume gradually, take rest days and stop if you feel sharp pain. Youth players should follow Pitch Smart guidelines and avoid throwing while fatigued.
Should kids use weighted baseballs?
Weighted balls are not necessary for most young players. If you use them, do so under the guidance of a qualified coach and keep the volume low.
What is a good throwing velocity for my age?
Speeds vary widely by age, size and experience. Compare yourself with your own past results rather than other players, and focus on steady improvement.
Final Thoughts: Your Path to a Faster Throw
Learning how to throw a baseball faster takes patience. It also takes a plan. Start with a solid grip and a strong lower half. Add hip and shoulder separation. Keep your arm loose and finish through your target.
Then support that motion with strength, mobility and smart recovery. Use drills to groove your mechanics, and track your progress with video and simple tests. Above all, protect your arm. A healthy arm can keep improving for years.
Remember that every great thrower started as a beginner. Small daily habits add up. Ten focused minutes of mobility, a few quality drills and a good night of sleep will help you more than one exhausting workout.
Stay consistent, stay curious and enjoy the process. With steady work, you will see your velocity climb and your confidence grow every time you step onto the field.
Related Reading
- More Baseball Training Guides on SportsNewsEra
- Baseball Tips and Drills on Sports Tamasha
- Baseball Skills and Fitness on Sports Dastak
Sources
- Vitruve: Baseball Velocity Training, How to Throw Faster
- TopVelocity: How to Throw a Baseball Step by Step
- TopVelocity: How Can Baseball Players Throw So Fast?
- MLB: Pitch Smart Guidelines
- USA Baseball: Pitch Smart Program Updates
- Sports Medicine Weekly: Pitch Smart Recommendations
- Wikipedia: Kinetic Chain
- Wikipedia: Tommy John Surgery